Nothing to see here... I finally got fed up with blogspot being generally crappy, so I've moved to a new location. Join me there!
Visualising the Ubuntu Package Repository
Like most geeks, I like data. I also like making pretty pictures. This weekend, I found a way to make pretty pictures from some data I had lying around.
The Data: Ubuntu Packages
Ubuntu is made up of thousands of packages. Each package contains a control file that provides some meta-data about the package. For example, here is the control data for the autopilot tool:Package: python-autopilot Priority: optional Section: universe/python Installed-Size: 1827 Maintainer: Ubuntu DevelopersOriginal-Maintainer: Thomi Richards Architecture: all Source: autopilot Version: 1.2daily12.12.10-0ubuntu1 Depends: python (>= 2.7.1-0ubuntu2), python (<< 2.8), gir1.2-gconf-2.0, gir1.2-glib-2.0, gir1.2-gtk-2.0, gir1.2-ibus-1.0, python-compizconfig, python-dbus, python-junitxml, python-qt4, python-qt4-dbus, python-testscenarios, python-testtools, python-xdg, python-xlib, python-zeitgeist Filename: pool/universe/a/autopilot/python-autopilot_1.2daily12.12.10-0ubuntu1_all.deb Size: 578972 MD5sum: c36f6bbab8b5ee10053b63b41ad7189a SHA1: 749cb0df1c94630f2b3f7a4a1cd50357e0bf0e4d SHA256: 948eeee40ad025bfb84645f68012e6677bc4447784e4214a5512786aa023467c Description-en: Utility to write and run integration tests easily The autopilot engine enables to ease the writing of python tests for your application manipulating your inputs like the mouse and keyboard. It also provides a lot of utilities linked to the X server and detecting applications. Homepage: https://launchpad.net/autopilot Description-md5: 1cea8e2d895c31846b8d3482f96a24d4 Bugs: https://bugs.launchpad.net/ubuntu/+filebug Origin: Ubuntu
As you can see, there's a lot of information here. The bit I'm interested in is the 'Depends' line. This lists all the packages that are required in order for this package to work correctly. When you install autopilot, your package manager will install all it's dependencies, and the dependencies of all those packages etc. This is (in my opinion), the best feature of a modern Linux distribution, compared with Windows.
Packages and their dependant packages form a directed graph. My goal is to make pretty pictures of this graph to see if I can learn anything useful.
Process: The Python
First, I wanted to extract the data from the apt package manager and create a graph data structure I could fiddle with. Using the excellent graph-tool library, I came up with this horrible horrible piece of python code:#!/usr/bin/env python
from re import match, split
from subprocess import check_output
from debian.deb822 import Deb822
from graph_tool.all import *
graph = Graph()
package_nodes = {}
package_info = {}
def get_package_list():
"""Return a list of packages, both installed and uninstalled."""
output = check_output(['dpkg','-l','*'])
packages = []
for line in output.split('\n'):
parts = line.split()
if not parts or not match('[uirph][nicurhWt]', parts[0]):
continue
packages.append(parts[1])
return packages
def get_package_info(pkg_name):
"""Get a dict-like object containing information for a specified package."""
global package_info
if pkg_name in package_info:
return package_info.get(pkg_name)
else:
try:
yaml_stream = check_output(['apt-cache','show',pkg_name])
except:
print "Unable to find info for package: '%s'" % pkg_name
package_info[pkg_name] = {}
return {}
d = Deb822(yaml_stream)
package_info[pkg_name] = d
return d
def get_graph_node_for_package(pkg_name):
"""Given a package name, return the graph node for that package. If the graph
node does not exist, it is created, and it's meta-data filled.
"""
global graph
global package_nodes
if pkg_name not in package_nodes:
n = graph.add_vertex()
package_nodes[pkg_name] = n
# add node properties:
pkg_info = get_package_info(pkg_name)
graph.vertex_properties["package-name"][n] = pkg_name
graph.vertex_properties["installed-size"][n] = int(pkg_info.get('Installed-Size', 0))
return n
else:
return package_nodes.get(pkg_name)
def get_sanitised_depends_list(depends_string):
"""Given a Depends string, return a list of package names. Versions are
stripped, and alternatives are all shown.
"""
if depends_string == '':
return []
parts = split('[,\|]', depends_string)
return [ match('(\S*)', p.strip()).groups()[0] for p in parts]
if __name__ == '__main__':
# Create property lists we need:
graph.vertex_properties["package-name"] = graph.new_vertex_property("string")
graph.vertex_properties["installed-size"] = graph.new_vertex_property("int")
# get list of packages:
packages = get_package_list()
# graph_nodes = graph.add_vertex(n=len(packages))
n = 0
for pkg_name in packages:
node = get_graph_node_for_package(pkg_name)
pkg_info = get_package_info(pkg_name)
# purely virtual packages won't have a package info object:
if pkg_info:
depends = pkg_info.get('Depends', '')
depends = get_sanitised_depends_list(depends)
for dependancy in depends:
graph.add_edge(node, get_graph_node_for_package(dependancy))
n += 1
if n % 10 == 0:
print "%d / /%d" % (n, len(packages))
graph.save('graph.gml')
Yes, I realise this is terrible code. However, I also wrote it in 10 minutes time, and I'm not planning on using it for anything serious - this is an experiment!
Running this script gives me a 2.6MB .gml file (it also takes about half an hour - did I mention that the code is terrible?). I can then import this file into gephi, run a layout algorithm over it for the best part of an hour (during which time my laptop starts sounding a lot like a vacuum cleaner), and start making pretty pictures!
The Pretties:
Without further ado - here's the first rendering. This is the entire graph. The node colouring indicates the node degree (the number of edges connected to the node) - blue is low, red is high. Edges are coloured according to their target node.These images are all rendered small enough to fit on the web page. Click on them to get the full image.


C++

Qt and KDE

Python

System

Gnome

Mono

Others
The wonderful thing about this graph is that the neighbourhoods are fractal. I've outlined several of the large ones, but looking closer reveals small clusters of related packages. For example: multimedia packages:
This is Just the Beginning...
This is an amazing dataset, and really this is just the beginning. There's a number of things I want to look into, including:- Adding 'Recommends' and 'Suggests' links between packages - with a lower edge weight than Depends.
- Colour coding nodes according to which repository section the package can be found in.
- Try to categorise libraries vs applications - do applications end up clustered like libraries do?
Writing UI Tests with Autopilot
At the UDS-r sprint in Copenhagen, I'll be running a session for anyone interested in Autopilot. There will be a demo, and Autopilot "experts" on hand to answer any questions you might have.
Autopilot is a tool for automating UI testing. We've been using it with great success in the last two Ubuntu cycles, and we're starting to support testing traditional Qt4, Qt5, Qml, and Gtk applications.
I hope to see you all there!
So you missed PyCon US...
If you're anything like me you've watched another PyCon US come and go. Living in New Zealand makes attending overseas conferences an expensive proposition. So you've missed the conference. You've watched all the talks on pyvideo.org, but it's still not enough. You'd love to attend a PyCon in person, perhaps one in an exotic location (what a great opportunity for a family vacation). Of course, I have a solution: Come to Kiwi PyCon!

In contrast to the US PyCon, Kiwi PyCon is a smaller, more intimate affair, with a few hundred delegates, two streams, and plenty of chances to meet other python hackers from the Australia/New Zealand/Pacific region. Places are limited, and registrations are open, so here's what you need to do to beat the post-PyCon blues:
- Go to nz.pycon.org, and register for the conference. While you're there, check out the sponsorship options!
- If you're feeling brave, submit a talk proposal!
- Book accommodation and flights (we will soon have accommodation options listed on the website).
- Count down the days to the conference!
It's that simple. Do it now!
Experimenting with C++ std::make_shared
C++11 is upon us, and one of the more utilitarian changes in the new standard is the inclusion of the new smart pointer types: unique_ptr, shared_ptr and weak_ptr. An interesting related feature is std::make_shared - a function that returns a std::shared_ptr wrapping a type you specify. The documentation promises efficiency gains by using this method. From the documentation:
This function allocates memory for the T object and for the shared_ptr's control block with a single memory allocation. In contrast, the declaration std::shared_ptrI was curious: How much faster is make_shared than using new yourself? Like any good scientist, I decided to verify the claim that make_shared gives better performance than new by itself.p(new T(Args...)) performs two memory allocations, which may incur unnecessary overhead.
I wrote a small program and tested it. Here's my code:
#include <memory>
#include <string>

class Foo
{
public:
    typedef std::shared_ptr<Foo> Ptr;

    Foo()
    : a(42)
    , b(false)
    , c(12.234)
    , d("FooBarBaz")
    {}

private:
    int a;
    bool b;
    float c;
    std::string d;
};

const int loop_count = 100000000;
int main(int argc, char** argv)
{
    for (int i = 0; i < loop_count; i++)
    {
#ifdef USE_MAKE_SHARED
        Foo::Ptr p = std::make_shared<Foo>();
#else
        Foo::Ptr p = Foo::Ptr(new Foo);
#endif
    }
    return 0;
}
This is pretty simple - we either allocation 100 million pointers using new manually, or we use the new make_shared. I wanted my 'Foo' class to be simple enough to fit into a couple of lines, but contain a number of different types, and at least one complex type.
I built both variants of this small application with g++, and used the 'time' utility to measure it's execution time. I realise this is a pretty crude measurement, but the results are interesting nontheless:
Kiwi PyCon Sponsorship Drive

Kiwi PyCon is approaching! You probably think that's a good thing, but if you're one of the poor volunteer organisers, that's a scary thought. Why? We have bills to pay, and very little income. That means it's time to shill for some cash! Below is an excerpt from our public sponsorship announcement email. If your company is willing to sponsor a good cause, please get in touch with me.
Kiwi PyCon is organised by the New Zealand Python User group - a not-for-profit organisation. We don’t make any profit from the conference, and the organisers donate their free time to make the event a success. We rely entirely on companies’ sponsorship to pay the bills.
Sponsorship has several advantages for you:
- It’s an opportunity to get brand exposure in front of the foremost Python experts from New Zealand and around the world.
- Presents a fantastic networking opportunity if you are looking to employ engineers now, or in the future.
- Align yourself with market leaders and past sponsors such as Github, Weta Digital, Catalyst IT, Mozilla. Become known as a Python promoter and industry leader.
- Gold sponsors receive five complimentary tickets to the conference and their logo on the conference shirt and all print materials.
If you’d like to sponsor the conference, a document describing sponsorship opportunities is available here.
To get in touch, email kiwipycon-sponsorship@nzpug.org.
Python GObject Introspection oddness
I recently ported indicator-jenkins to Gtk3 using the python GObject Introspection Repository (gir) bindings. Ted Gould did most of the work, I just cleaned some bits up and made sure everything worked. One issue that puzzled me for a while is that the GObject library changed the way it's "notify" signal works between GObject 2 and GObject 3. I've not seen any documentation of this change, so I'll describe it here.
For this example, let's make a very simple class that has a single property:
import gobject


class MyClass(gobject.GObject):

    prop = gobject.property(type=int)
...and a very simple callback function that we want to call whenever the value of 'prop' changes:
def cb(sender, prop):

    print "property '%s' changed on %r." % (prop.name, sender)
Finally, with GObject 2 we can create an instance of 'MyClass' and connect to the 'notify' signal like this:
inst = MyClass()

inst.connect("notify", cb)

inst.prop = 42
When we run this simple program we get the following output:
property 'prop' changed on
... which is what we expected. However, if we port this code to GObject 3, it should look like this:
from gi.repository import GObject


class MyClass(GObject.GObject):

    prop = GObject.property(type=int)


def cb(sender, prop):

    print "property '%s' changed on %r." % (prop.name, sender)


inst = MyClass()

inst.connect("notify", cb)

inst.prop = 42
However, running this gives an error:
/usr/lib/python2.7/dist-packages/gi/_gobject/propertyhelper.py:171: Warning: g_value_get_object: assertion `G_VALUE_HOLDS_OBJECT (value)' failed

  instance.set_property(self.name, value)

Traceback (most recent call last):

  File "gobject3.py", line 8, in cb

    print "property '%s' changed on %r." % (prop.name, sender)

AttributeError: 'NoneType' object has no attribute 'name'
The 'prop' parameter in the callback is set to None.
There is a solution however - connecting the callback to a more specific notification signal works as expected:
from gi.repository import GObject


class MyClass(GObject.GObject):

    prop = GObject.property(type=int)


def cb(sender, prop):

    print "property '%s' changed on %r." % (prop.name, sender)


inst = MyClass()

inst.connect("notify::prop", cb)

inst.prop = 42
It took me a while to figure this out - hopefully I've saved someone else that work.
Indicator-jenkins is now even more awesome
My latest hobby project, indicator-jenkins is now even better (I wrote about this previously, in case you missed it).
New features since my last blog post:
- The code is now much nicer, and will be much easier to extend. My long-term goal is to support other types of CI servers (I'll probably have to change the project name I guess).
- Desktop notifications are generated for each new build of a monitored project. The notification includes the status and health report of the last build.
- LOTS of bug-fixes, especially around the settings UI. I'm still not happy with the settings dialog UI, but it's at least usable now.
$ sudo add-apt-repository ppa:thomir/indicator-jenkins
$ sudo apt-get install indicator-jenkins
Then launch indicator-jenkins from the unity dash or command line (Note: Launching it from the command line generates a LOT of debug output - I will turn this off in future releases).
How to Compile Unity from Source
These instructions will help you build unity from source. However, there are a
few things to consider:
- I recommend that you never copy anything you've built locally outside your home directory. Doing so is asking for trouble, especially as we're building the entire desktop shell. If you manage to ruin your system-wide desktop shell you'll be a very sad programmer!
- I'm assuming that you're running the precise Ubuntu release (still in alpha at the time of writing, but very usable).
- I'm also assuming that you want to build unity from trunk (that is, lp:unity).
Getting the source code
If you don't already have Bazaar installed, install it now:sudo apt-get install bzr
You may want to make yourself a folder for the unity code. I tend to do something like this:
mkdir -p ~/code/unity
cd ~/code/unity
Let's grab the code from launchpad:
bzr branch lp:unity trunk
This may take a while. If you prefer to use Bazaar checkouts instead of branches, that's fine to.
Installing Build Dependancies
We need to get the build-dependancies for unity. Thankfully, apt-get makes this trivial:sudo apt-get build-dep unity
Compiling Unity
I have a set of bash functions that makes this step significantly easier. To use them, copy the following bash code into a file in your home directory called ".bash_functions":function recreate-build-dir()
{
rm -r build
mkdir build
cd build
}
function remake-autogen-project()
{
./autogen.sh --prefix=/home/thomi/staging --enable-debug
make clean && make && make install
}
function remake-unity()
{
recreate-build-dir
cmake .. -DCMAKE_BUILD_TYPE=Debug -DCOMPIZ_PLUGIN_INSTALL_TYPE=local -DCMAKE_INSTALL_PREFIX=/home/thomi/staging/ -DGSETTINGS_LOCALINSTALL=ON
make && make install
}
function unity-env
{
export PATH=~/staging/bin:$PATH
export XDG_DATA_DIRS=~/.config/compiz-1/gsettings/schemas:~/staging/share:/usr/share:/usr/local/share
export LD_LIBRARY_PATH=~/staging/lib:${LD_LIBRARY_PATH}
export LD_RUN_PATH=~/staging/lib:${LD_RUN_PATH}
export PKG_CONFIG_PATH=~/staging/lib/pkgconfig:${PKG_CONFIG_PATH}
export PYTHONPATH=~/staging/lib/python2.7/site-packages:$PYTHONPATH
}
Note: You will need to replace all instances of "/home/thomi" with your own home directory path!
Now run this in a terminal:
echo ". ~/.bash_functions" >> ~/.bashrc
This ensures that the next time you open a bash shell the functions listed above will be available to you. To avoid having to close and re-open a terminal, we can read them manually just this once:
. ~/.bash_functions
You should now be able to run:
remake-unity
from the trunk/ directory we created earlier. That's it - you're building unity!
Not so Fast!
Chances are, while trying to build unity, you found that it needed a newer version of one of the several supporting projects than you had installed. At the time of writing, you can't compile unity without first building nux from sources first. Thankfully, that's pretty easy with the use of the functions you now have set up.First we get the source code:
mkdir -p ~/code/nux
cd ~/code/nux
bzr branch lp:nux trunk
cd trunk
Then we need to get the build dependencies for nux.
sudo apt-get build-dep nux
Unfortunately there are a fewpackages missing, so you'll want to install them as well:
sudo apt-get install gnome-common libibus-1.0-dev libgtest-dev google-mock libxtst-dev
Then we use the functions above to build nux:
remake-autogen-project
That's it! You can then go back and build unity - hopefully this time with better success.
Build Notes
You may have noticed that the remake-* scripts do a complete rebuild every time. If you'd prefer to just build the files that have changed since last time, change to the trunk/build/ directory, and run:make && make install
Running Unity
If you'd like to run the version of unity you've built, rather than the system-wide version, open a terminal and run the following commands:unity-env unity --replace &
The first line patches several environment variables such that unity will subsequently be launched from your local staging directory. These environment variables will remain changed until you close the terminal, so you need only run unity-env once.
Introducing: indicator-jenkins
For my day job I've been monitoring a jenkins instance (specifically, the public Ubuntu QA jenkins instance) using my web browser. This is obviously suboptimal - I'd like to be able to see the state of the jenkins jobs I'm interested at a glance, without having to open my web browser.
I couldn't find a solution to my problem, so I created one: indicator-jenkins is a panel indicator for your desktop manager of choice. It allows you to select one or more jobs from a jenkins server, and follow the job state without having to open your browser.
The project is hosted on launchpad, and is built daily into my PPA. To install it (I'm assuming you're running Ubuntu):
$ sudo add-apt-repository ppa:thomir/indicator-jenkins
$ sudo apt-get update
$ sudo apt-get install indicator-jenkins
Once it's installed you can launch it in a couple of different ways:
- From a terminal - jut run indicator-jenkins. If you run it on the terminal you'll get a lot of debugging output (useful if you want to submit a patch, or figure out why it's not working).
- From the unity dash - open the dash, and search for 'jenkins' - it's probably going to be the first link.

Once it's running you should see the jenkins icon in your panel. To set it up, click the icon to open the settings dialog, enter the URL of the jenkins instance you want to look at, hit the refresh button, and pick the job(s) you want to monitor. Click OK and you're done! It's simpler than it sounds - see for yourself:
Right now it's pretty rough-and-ready - there are many features I'd like to add:
- Integrate desktop notifications, so you can be alerted when a job state changes.
- Customise panel icon based on job state (i.e.- show a red icon if any of the monitored jobs are failing).
- Allow user to customise refresh period.
- Allow user to monitor jobs from more than one jenkins server.
- Show more information about a jenkins job. For a start, show stability as well as current status, and maybe in the future show unity test pass/failure rates for projects that have that information.
The entire application is written in python. We make use of several python modules:
- The python-appindicator package gives us the ability to create an icon on the menu, and the python gtk2 bindings are used to create the menu and settings dialog.
- The python 'multiprocessing' module is used to spin up worker processes to fetch the data from jenkins. Initially the application used threads for this, but python's threading support isn't great, and it was taking too long.
- The python 'json' module is used to save and load settings.
- The python-jenkins package is used to communicate with the jenkins server.
KiwiPyCon Sloecode Talk
It's about time I posted my Kiwi PyCon talk from last August! I spent an enjoyable 30 minutes talking about what Sloecode is, how we built it, and the problems encountered along the way. As per my usual approach to public speaking, I tried to keep things light-hearted and entertaining. Anyway, the slides and audio are available here:
Dear Journalists: Bits and Bytes
Dear Journalist type person,
There's something we must discuss. You see, you've been making a very basic mistake in many of your articles when it comes to writing about the Internet, and specifically Internet speeds. Let's take a look at a small quote:
...unless you have an internet connection of impossible speeds. (Mine is nominally 10MB, by the way, which in practice means maximum download speeds of 1.4 megabytes per second).(source: Rock-Paper-Shotgun).
Can you spot the problem here? Internet speeds are measured in megabits per second. The symbol for 'bits' is a lower-case 'b', so an Internet connection that's 10 Megabits per second could be written as "10 Mbps". I guess if you're feeling lazy you could leave off the "ps", and end up with "10 Mb" (although it's a really sloppy thing to do), but NEVER "10 MB" - that means something else entirely.
Modern PCs use bytes that contain 8 bits. The correct symbol for a byte is an upper-case 'B'. so "10 MB" means "ten mega-bytes", not mega-bits, which is probably what you meant when you were describing the speed of your Internet connection.
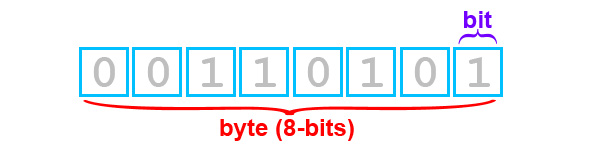
If your eyes glazed over, or perheps you felt light-headed reading that, here are a few take-home points to make it easier for you:
- Connection speeds are measured in megabits-per-second. The correct unit symbol for this is "Mbps".
- Files are measured in Megabytes.
- A Byte has 8 bits. So to turn your connection speed into something useful, divide the number by 8 and make the unit symbol "MBps".
Kind Regards,
KiwiPyCon 2012 will be in Dunedin
It is a great honour and privilege to be involved in bringing the New Zealand Python developers conference (KiwiPyCon) to Dunedin in 2012. I intend to blog regularly with details of next year's conference as they emerge, so watch this space for more information over time!
Finally, a huge "Thank You" to Tim McNamara for organising the best KiwiPyCon to date. I have a huge task ahead of me, and he's raised the bar very high indeed.
Have any good ideas for next year? Please let us know!
Sloecode 1.1 - get your bugreports in now!
I'm at KiwiPyCon in Wellington, New Zealand. It turns out, being surrounded by geeks is great inspiration & motivation. Because of this, I've created a Sloecode 1.1 milestone in launchpad. If you have any bugreports or feature reuests, now's the time to get them in!
...I can't believe I'm asking people for bug-reports. This feels wrong...
Sloecode: now with 100% more website
Sloecode now has a real website! It's a rather minimalist affair at present, but it's better than nothing!
Since I last blogged, the setup instructions for the Sloecode server have changed a lot. The new instructions are available on the new site.
Representin' the home-boys!
That's *exactly* the kind of blog title that's liable to get me in trouble down the road. Faux street swagger doesn't age well.
In other news, I'm presenting a talk at this years NZ Python conference KiwiPyCon. Their website does not have the schedule visible yet, but there is a list of talks available.
I'm looking forward to meeting other python developers, and maybe getting some help with Sloecode!
Unity Workarounds
I'm currently running the unity desktop shell on my development computer. I got fed up with KDE's lack of support, and the gnome-shell just annoyed me. Unity seems like a good start, but suffers from several problems. I've found workarounds for all of these, and thought I'd post them below.
Scrollbar Corruption:
One of the major changes in unity is the thin scrollbars (technically called "overlay scrollbars", I believe), which are enabled by default for all GTK applications. This is what I'm talking about (image from techgarage.com):


The problem can be avoided by turning the thin scrollbars off. How do you do that? Easy - launch the application with the "LIBOVERLAY_SCROLLBAR" environment variable set to 0, like this:

Panel Corruption:
Whenever I change a setting in the compiz config settings manager (ccsm), the top panel of my unity desktop becomes corrupted. Previously the only way to fix this was to log out and log back in again (effectively restarting unity). Here's a screenshot of the problem:

Solution:
When this happens you can restart unity without having to logout, or close any applications. Simply run (either by pressing Alt+F2, or in a terminal):
unity --replace
CAPTCHA Fail
I can understand the need to filter humans from machines on the Internet, but we need to do a much better job. It seems like the most common captcha software I run into these days is reCAPTCHA. The system has some noble goals - specifically, users who submit captchas are actually helping digitize books. However, here's the problem:
 What the hell does that say? The first word is obviously "the", the second? "Claccupr?". Perhaps I have bad eyesight, but I often get these wrong. Here's an alternative proposal:
Instead of asking humans to perform text recognition (something computers can already do reasonably well), ask them to do something that comes naturally to humans, but not to computers. How about asking the user to pick which image they might find at a beach. Or ask the user to pick the image that represents the largest object in real life. Use context that humans understand instinctively, but computers do not.
Any ideas? Someone should build it!
Any ideas? Someone should build it!
Sloecode: Now with Ubuntu Packages!
What is Sloecode?
Sloecode is an open source project, hosted on launchpad.net that aims to provide a comprehensive, installable code forge. A "code forge" is a set of tools that help groups of people write software (think sourceforge, launchpad etc). It typically includes a revision control system, and optionally project wikis, bug tracking, issue tracking, feature planning and any other features people might need. However, it's important to note that we're not trying to replicate Launchpad! Launchpad is a great service, and we don't want to compete with it. Instead, we're providing a tool for people who:
- Don't want their code to be public - either because it's commercial software or because it's not ready yet. You can use sloecode in your business, college, university without having to release your software to the wider world. You can do this on launchpad, but you must pay for the privilege. The project was borne out of the need to have a code forge for an educational environment: putting students' work online is not an option.
- Want their code forge system to be hosted locally. For large code bases, the communication times between a local machine and the central launchpad.net servers can become expensive - especially in locations where the Internet connection is poor. Running sloecode is easy (as we'll see soon) and gives you complete control over the system. You're are responsible for server maintenance, backup, and general administration.
Compared to Launchpad, we're aiming for a completely different user base.
How does it Work?
Sloecode is made up of two distinct parts:

The Bazaar/SSh smart server is a python-twisted application that understands the SSH protocol, and runs bzr-serve on demand for users. Every time you interact with the server using a Bazaar client application you're actually talking to the smart server. We need this component for several reasons: first, we don't want users to require a system account on the Linux server (which is the usual way of setting up a Bazaar server), but we do still want to use SSH public/private key authentication. This means the SSH server needs to know about our database and be able to retrieve keys from it on demand.
The Sloecode Web App is the front-end for the whole system. It's written in pylons, and makes use of a whole host of other libraries including jinja2 (page templates), formencode (input validation), YUI3 (javascript components), repoze.what and repoze.who (authorisation and authentication), and a whole lot more. The web-app provides control for managers and administrators to create projects and users and assign users to projects (with different levels of access). Regular users can see basic information about their bazaar branches (both personal repositories and project repositories), and manage their SSH keys.
The plan for the future is to add optional components - the key word being optional. One of our design goals is to make sloecode easy to install; this includes minimising install-time dependancies.
The key thing to understand about Sloecode is that we're not writing the VCS ourselves - we're simply making Bazaar easier to install and manage.
Enough already, give me the server!
Sloecode has not yet been released, but you are welcome to participate in testing. To set up the server, you'll first need the sloecode PPA in your sources.list. To achieve this, run the following command:
Then update your package lists:
You can now install the sloecode server package:
The server package should install all the package dependancies. However, before you can run the server, you need to set up the database back-end. The default back-end us sqlite, which is fine for testing or for very low-use installations. Sloecode uses sqlalchemy, which allows us to use any number of databse backends. This, and many other configuration details can be edited by tweaking this file:
Once you're happy with the settings, you need to create the database tables. Do this by running:
This command will read the values present in the configuration file, and create the default database tables for you. You only need to run this command once (to create the tables in your database)!
If you have edited any of the other values, you will want to restart the server:
By default, log files are in /var/log/sloecode, Bazaar repositories are created in
and the default database is a simple SQLite file (which won't handle any kind of heavy workload or concurrency, so you may wish to change that). The RSA public/private key pair the smart server uses to communicate with clients are stored in
And the clients?
Client setup is much simpler. Simply follow these steps:
That's it! Everything is all set up. Now you can start using the sloecode server.
Bazaar / Sloecode Basics
I won't cover the details of how to use Bazaar. If you need that instruction, look at the official Bazaar documentation. However, here are a few pointers:
The Sloecode Web App is the front-end for the whole system. It's written in pylons, and makes use of a whole host of other libraries including jinja2 (page templates), formencode (input validation), YUI3 (javascript components), repoze.what and repoze.who (authorisation and authentication), and a whole lot more. The web-app provides control for managers and administrators to create projects and users and assign users to projects (with different levels of access). Regular users can see basic information about their bazaar branches (both personal repositories and project repositories), and manage their SSH keys.
The plan for the future is to add optional components - the key word being optional. One of our design goals is to make sloecode easy to install; this includes minimising install-time dependancies.
The key thing to understand about Sloecode is that we're not writing the VCS ourselves - we're simply making Bazaar easier to install and manage.
Enough already, give me the server!
Sloecode has not yet been released, but you are welcome to participate in testing. To set up the server, you'll first need the sloecode PPA in your sources.list. To achieve this, run the following command:
sudo add-apt-repository ppa:sloecode
Then update your package lists:
sudo apt-get update
You can now install the sloecode server package:
sudo apt-get install sloecode
The server package should install all the package dependancies. However, before you can run the server, you need to set up the database back-end. The default back-end us sqlite, which is fine for testing or for very low-use installations. Sloecode uses sqlalchemy, which allows us to use any number of databse backends. This, and many other configuration details can be edited by tweaking this file:
/etc/default/sloecode-production.ini
Once you're happy with the settings, you need to create the database tables. Do this by running:
sudo paster setup-app /etc/default/sloecode-production.ini
This command will read the values present in the configuration file, and create the default database tables for you. You only need to run this command once (to create the tables in your database)!
If you have edited any of the other values, you will want to restart the server:
sudo service sloecode restart
By default, log files are in /var/log/sloecode, Bazaar repositories are created in
/srv/sloecode/bzr-repos
and the default database is a simple SQLite file (which won't handle any kind of heavy workload or concurrency, so you may wish to change that). The RSA public/private key pair the smart server uses to communicate with clients are stored in
/var/sloecode/keys
And the clients?
Client setup is much simpler. Simply follow these steps:
- Make sure you have an account created for you in the sloecode web interface. Log in to the web interface with your username and password.
- Click on the "Manage SSH Keys" link on your home page. You need to paste your SSH public key in the form provided. This allows your Bazaar client to authenticate with the sloecode server. If you don't have an SSH key, you can generate one by running:
ssh-keygen
and view the public key by running:
cat ~/.ssh/id_rsa.pub
- All client machines need the 'bzr' and 'bzr-sloecode' packages installed. Assuming you have the sloecode PPA installed (see instructions for doing this in the server section, above), you can run:
sudo apt-get install bzr bzr-sloecode
- Finally, you need to tell the Bazaar sloecode plugin where the sloecode server is. The client plugin looks for an environment variable called "SLOECODE_SERVER", and will complain if it is not found. The easiest way to set this environment variable is to edit your "~/.bashrc" file and add this line to the end:
export SLOECODE_SERVER=domain.of.your.server.com
The value of this variable should be either a domain name, OR an IP address that points to the sloecode server you wish to use. For example, if the server is installed on the local network you might have the following:
export SLOECODE_SERVER=192.168.1.10
Note that you must not add any network protocol specification - the sloecode client plugin takes care of that for you. If you are running the sloecode ssh service on a port other than 22, you must add this port to the end of the string, like so:
export SLOECODE_SERVER=192.168.1.10:4022
- Finally, if your username on the sloecode server is different from your local computer username, you need to tell the Bazaar sloecode plugin what username it should use. To do this, run the command:
bzr sc-login sloecode_username
Where "sloecode_username" is the username you use to log in to the sloecode web interface. For example, on my machine the command is:
bzr sc-login thomir
If you run the command without a username it will tell you what username is currently set.
That's it! Everything is all set up. Now you can start using the sloecode server.
Bazaar / Sloecode Basics
I won't cover the details of how to use Bazaar. If you need that instruction, look at the official Bazaar documentation. However, here are a few pointers:
- Every user on the sloecode server has a personal repository. To push code to your personal repository, do this:
bzr push sc:~sloecode_username/branch_name
By default personal repositories are created with no branches, so whenever you push or pull from a personal repository you must always specify a branch name!
- Personal repositories are private - you are the only one who can read or write to your personal repository. If you need to share your code with someone else, you need to store it in a project repository.
- To pull code from a project repository, the command looks like this:
bzr pull sc:project_name/branch_name
Note that there is no tilde character before the project name. Also note that you need not specify the branch name if you want the special branch called "trunk". For example, if I want a copy of the trunk branch of project "elastic", I'd run the following command:
bzr pull sc:elastic
However if I want a specific branch called "fix-bug-1234", I'd run the following:
bzr pull sc:elastic/fix-bug-1234
Final Thoughts:
We're still writing sloecode - it's an ongoing effort and won't be finished any time soon. We welcome your feedback - the best way to contact is us via the sloecode-developers mailing list, or in the #sloecode channel on freenode IRC, or leave a comment below. Have we missed anything? Spot any bugs? Have suggestions for improvements/future direction? We'd love to hear from you!
We're still writing sloecode - it's an ongoing effort and won't be finished any time soon. We welcome your feedback - the best way to contact is us via the sloecode-developers mailing list, or in the #sloecode channel on freenode IRC, or leave a comment below. Have we missed anything? Spot any bugs? Have suggestions for improvements/future direction? We'd love to hear from you!
Sloecode updates: UI tweaks
Several members of the sloecode team have been hard at work tweaking the sloecode web-app UI - we think we have a much more usable product as a result. We've still got a long way to go, but the UI is looking better every day. Here's a picture of the portal page a user sees when they log in:

- Addition of the project menu - this allows users to quickly jump to any project they are a member of.
- Branch logs are now shown on separate pages, instead of cluttering up the main user/project page.
- "Account Settings" and "Logout" Links are now pushed to the right of the page menu bar, which is where most users expect them to be.
- More help topics have been written.
- Lots of small textual changes to page content - too many to list individually.
We still have not got the server package into our PPA. In the mean time, installing and running a sloecode server involves a few manual steps, but is by no means complicated. If you're interested in the project, feel free to drop in the #sloecode channel on irc.freenode.net, or introduce yourself on the sloecode developers mailing list!
Subscribe to:
Posts (Atom)

 Posts
Posts


 View Thomi Richards's profile